ALL YOU WANT OF LIFE; EVERY DREAM, EACH WISHFUL BLISS, IS WAITING... TO BE CREATED.

Tuesday, February 23, 2010

Pointed Square Paper Gift Box

I needed a quick 'thinking of you' gift box.

This is such an adorable pattern, and it only takes a few minutes from start to finish!

Materials Needed:
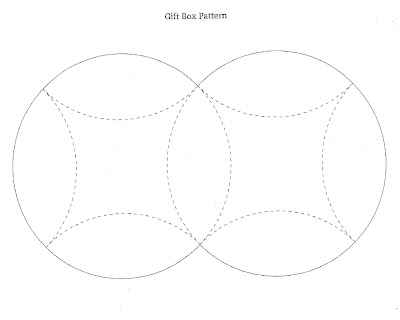
Gift Box Pattern (picture and instructions below)
8.5x11 piece of paper
scissors
tape or glue
stylus (or mechanical pencil)

Here's How:
Print out a copy of the gift box pattern found below:
Again, I still haven't figured out how to attach a PDF file,
but you can copy this picture and paste it in Microsoft Word.
Re-size it to fill the page, and you'll have a digital copy.

Next, cut out the circles.  Use a stylus (or the tip of a mechanical pencil) to trace the dotted lines.

This will imprint the paper enough for you to fold on the dotted lines.

Start in the middle, and work your way out. 

Once all my creases were made, I decorated the edges with some markers
(these are also ADORABLE if you use colored/printed paper),
but I already had a copy made on white...

Then you can start folding it up:

Be sure and secure 3 sides with tape or glue

You will obviously leave one side open,

So you can fill it with the goods:

Then you can close it up,

and tie on some matching ribbon...

And you have the perfect little gift box!  Love it!
Happy Crafting!

Tuesday, February 16, 2010

Oreo Cake

I love cake decorating!  It's like scrapbooking... you get to be creative and crafty, only you get to eat it too!
Cannon just turned 4.  
I had hopes of decorating him a really spectacular 'boy' cake, but quickly ran out of time and realized that all of my equipment is locked away in storage.  

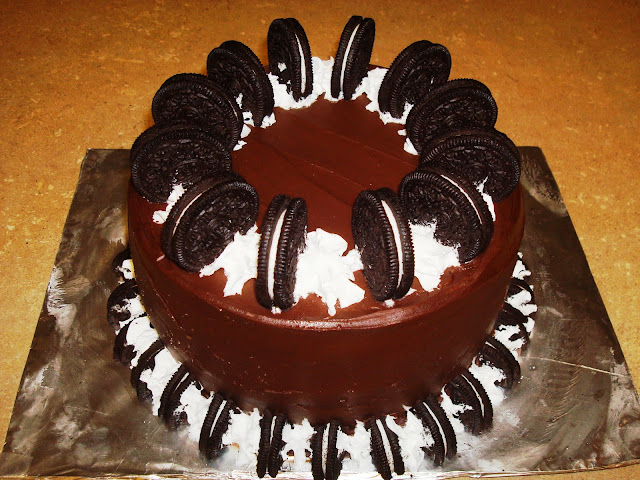
I made an oreo cake instead.

This is the EASIEST cake to make, it doesn't require any special cake decorating stuff, and it always looks great!

See what I mean?

Materials Needed:
cake (whatever size you want - I stacked 8" rounds around a layer of ice-cream)
1 can of chocolate fudge frosting (I bought mine, you can make it if you want)
package of oreo cookies
1 bottle (spray) can of whip cream
knife to frost with


Here's How to do it:
Start by frosting the cake - try to make as nice of a finished look as possible, especially on the top edges

Next, run a thick layer of frosting around the bottom edge of the cake:

Take about 10 oreos, and cut them into 4 quarters (this is much easier with a very sharp knife)

One at a time, attach the oreo sections to the bottom of the cake, leaving a small space between each cookie.  The frosting will hold them upright.

Use your whip cream bottle to fill in the spaces between the cookies.  It makes a great looking 'star' design:

Now, make some mounds of whip cream on the top of the cake (about the size of an oreo, only higher).  Be sure to space them evenly (from side to side as well as diagonally across the cake):

Next, stick a whole oreo down into the cake, in-between each whip cream mound.
 

And you're done!

The entire decorating process took me under 10 minutes!  It took me longer to bake the cake!
And it recieved a lot of compliments!

Since this was an ice-cream cake, I kept mine in the freezer.
You would have to keep it in the fridge/freezer for the whipcream (or you could replace whip cream with icing).

Happy Decorating!

Tuesday, February 9, 2010

Desktop Flip Calendar

I can make calendars even though it's February, right?
One month doesn't really matter...

Okay, so I made two calendars last week, remember?  Only... one was for 2011, and I thought I should give one to my mother-in-law since she gave me the idea.

That left me with nothing.
Then I was cleaning up some old stuff and found an old flip calendar

Inspiration struck yet again...
I came up with this beauty:
Oh, so cute!
And easy... took me under an hour.  Here's how to do it:

Materials Needed:
Old flip calendar
(really I only used the black piece of cardstock and the plastic twirly thing at the top that holds it all together)
1 - Pink paper measuring 2 3/4 x 5 1/4 "
1 - Pink paper measuring 5 1/4 x 3/4"
3 - Pink paper flower punchouts
1 - Printed quote paper measuring 2 1/2 x 5"
1 - Printed quote paper strip (just one strip of the saying - mine reads "Life...enjoy the ride..."
3 - Brads
Hole Punch

Here's How:
Take the calendar apart - you need the twisty thing at the top and I used the backing - a high gloss black cardstock page.

Cut the black cardstock in half, so you have two pieces that are 5 1/2 x 8 1/2"

Take one of those pieces, and measuring from the top (with the holes), score the paper at 3", 5" and then 8"
Then fold on the score lines.
It should look like this:

Now take the other half of the black paper, and cut it in half, leaving you with
2 pieces measuring 2 3/4 x 8 1/2"

Then take each of those pieces, and cut them in half again, leaving you with
4 pieces measuring 1 5/8 x 8 1/2.

You will then cut each of those pieces into 3'rds (am I losing you?)
It should look like this:
So I had 4 strips, and I cut one of them into 3rds.

This will leave you with 12 pieces measuring 2 1/2 x 1 5/8" 
(You should have a little scrap of paper left over from each strip, but don't throw it away).

Now, you will need to ink all of the edges to your pink and printed quote paper.
I used black ink.

While those are drying, use a hole punch to punch holes in the black pieces that don't already have them
(you should have 4 that are already punched)

Next, attach your pink and printed paper together...
Pink on black, then
Print on Pink

Then your small saying will go on top of the pink strip (I placed mine near the bottom).
That strip then lies near the bottom of the larger papers.
It should look like this when finished:

Now you are ready to attach it to the calendar.
You will put it on the surface just under the 1/2" crease, like this:

Now put some tape or glue on that 1/2" flap, and attach it to the back side, just under the holes, like this:

The calendar should stand upright, and the front face should be curved, while the back is straight.

Once that is finished, you can start putting the black twisty thing back through the holes.
Remember to attach your 12 black papers as well.  I put mine 3/4 - 1" from the side:

Go ahead and cut the curly thing to fit your new calendar.

Now, remember those tiny scrap pieces that you had left over from the black paper?
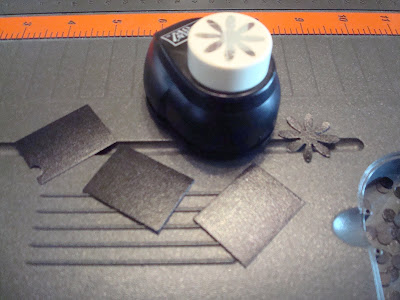
Use 3 of those and cut out some cute little flowers  (or whatever punch you have)

Then cut out 3 flowers from your pink paper, to shadow the black ones.
Use 3 brads to stick them together.

And stick them to your calendar - positioned however you think looks the best:

Now it's time to print your calendar.
I tried for a while to make my own on Microsoft Word using a table, but my space was too small.
I ended up just printing the table with the month names, and I wrote in the rest.

I printed them on coordinating paper, and then cut them out.

Then stick them to your little black flaps:

And You're Done!


As my husband would say...
This is definately the cutest thing I've made all day!

I must admit that it looks pretty wonderful sitting there on my printer...

Tuesday, February 2, 2010

Pop-Up Quote Calendar

My mother-in-law was describing to me this cute little calendar her ward was making for a Relief Society get together.

I was intrigued...

I have been needing a little calendar to sit on my desk.
Not one to write on, just something simple, so I can know what day it is.

A few days later I got a cheapo calendar in the mail, and all the pieces just fell together...
There was a page of monthly caldendars for 2011 at the back

As well as the 2010 monthly calendars at the bottom of each month...

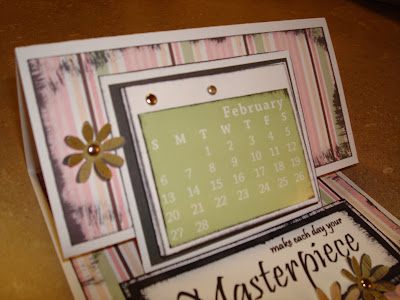
This is what I came up with.

Pop-Up Quote Calendar

Here are some other views...
And now for the tutorial...

Materials Needed:
You can mix and match colors (obviously), but I only used 3 different paper colors: white, black, and the pink print

Monthly Calendar Layouts
(I got mine from the caledar in the mail, but you could print them off of the computer or something)
Mine measured around 2.5x3"

White Paper
1 - 12x6" heavy cardstock
1 - 3.75x3.125" heavy cardstock
1 - 2x4.75" heavy cardstock
1 - 1.5x4.25" heavy cardstock (this is for your quote - I printed mine off of the computer)
12 - 3.25x2.67 plain paper

Black Paper
1 - 3.5x2.87" piece
1 - 1.75x4.5" piece

Pink Print
1 - 5.75x5.75" square
1 - 5.75x2.75" piece

You will also need:
5 brads
glue or tape or sticky squares
raised foam stickies
and a Flower Punch

Here's How:
Score the 12x6" white cardstock piece at 3" and 6"
Fold the score lines to make the calendar

Next, ink all the edges to all of your remaining papers (yes, all of them).
This is an optional step, but I think it makes it look SOOOO much better.
I used black ink.

After they dry, take the large piece of printed paper, and position it in the middle of the unfolded portion of the calendar.

Are the crazy dimensions starting to make sense now?  Everything should be just smaller than the piece that it fits on, so it makes a wonderful looking border...

Then take the smaller piece of printed paper and position it in the middle of the upper flap of the calendar

Next, take all of your monthly calendars and stick them to the 12 pieces of white paper

Then you can stick the black square paper to the white one...

This will be the background for the months.
Figure out where you are going to stick your brads, and make the holes with a large sewing needle (or a brad hole punch)

(I only did two holes, because some of the monthly calendars were bigger than others, and if I did 3 all the way across the top, it would have overlapped the month)

Next, stick your brads through all of the months and the background paper.

If they are long enough, put them through the calendar paper as well.  If not, just tape or glue it on.
Position it about 1/2" from the top, so it hangs about 1/2" off the bottom

You should be left with your quote paper, a black paper, and another white paper.
They stack on top of the other, like this:

Now, get your raised foam stickies...
The raised stickies should be placed on the top portion of the quote.
Use regular glue or tape for the bottom portion of the quote.
(Find out why in a second)
Finally, attach the quote to the bottom portion of the calendar.
I positioned mine about 3/4" from the bottom.

The calendar will get stopped by the raised portion of the quote, like this...
This will keep everything upright... so the calendar wont lay down flat.

Now it's time to accessorize!
I added 3 paper flowers, and used the same brads to secure them.

And you're done!

Super cute if you ask me...
One for 2010, and one for 2011 (or for the gift giving box, more likely)...